The Complete Guide to Deploying Rails 8 with Kamal on Hetzner

This is a complete, end-to-end guide to deploying a Rails 8 application with the Solid stack using Kamal on a Hetzner dedicated server. We will go from ordering a server to running your app in production with background jobs, backups, and monitoring.
Assumptions: You have a Rails 8 application ready to deploy. Your app uses SQLite with the Solid stack (Solid Queue, Solid Cache, Solid Cable) — the default for new Rails 8 apps.
Server requirements: A dedicated server or VPS with at least 2 GB of RAM. We will use Hetzner, but these instructions work with any provider (DigitalOcean, Vultr, OVH, etc.) — you just need a server running Ubuntu with SSH access.
Getting a Server on Hetzner
Hetzner offers auction servers starting around 36 EUR/month. These are dedicated hardware — not shared VPS — with plenty of CPU, RAM, and storage. For a Rails app running the Solid stack, this is more than enough.
When ordering your server, make sure to add your SSH public key so you can log in immediately once it is provisioned.
Once your server is ready, log into Hetzner Robot and select your server. Click the Linux tab.
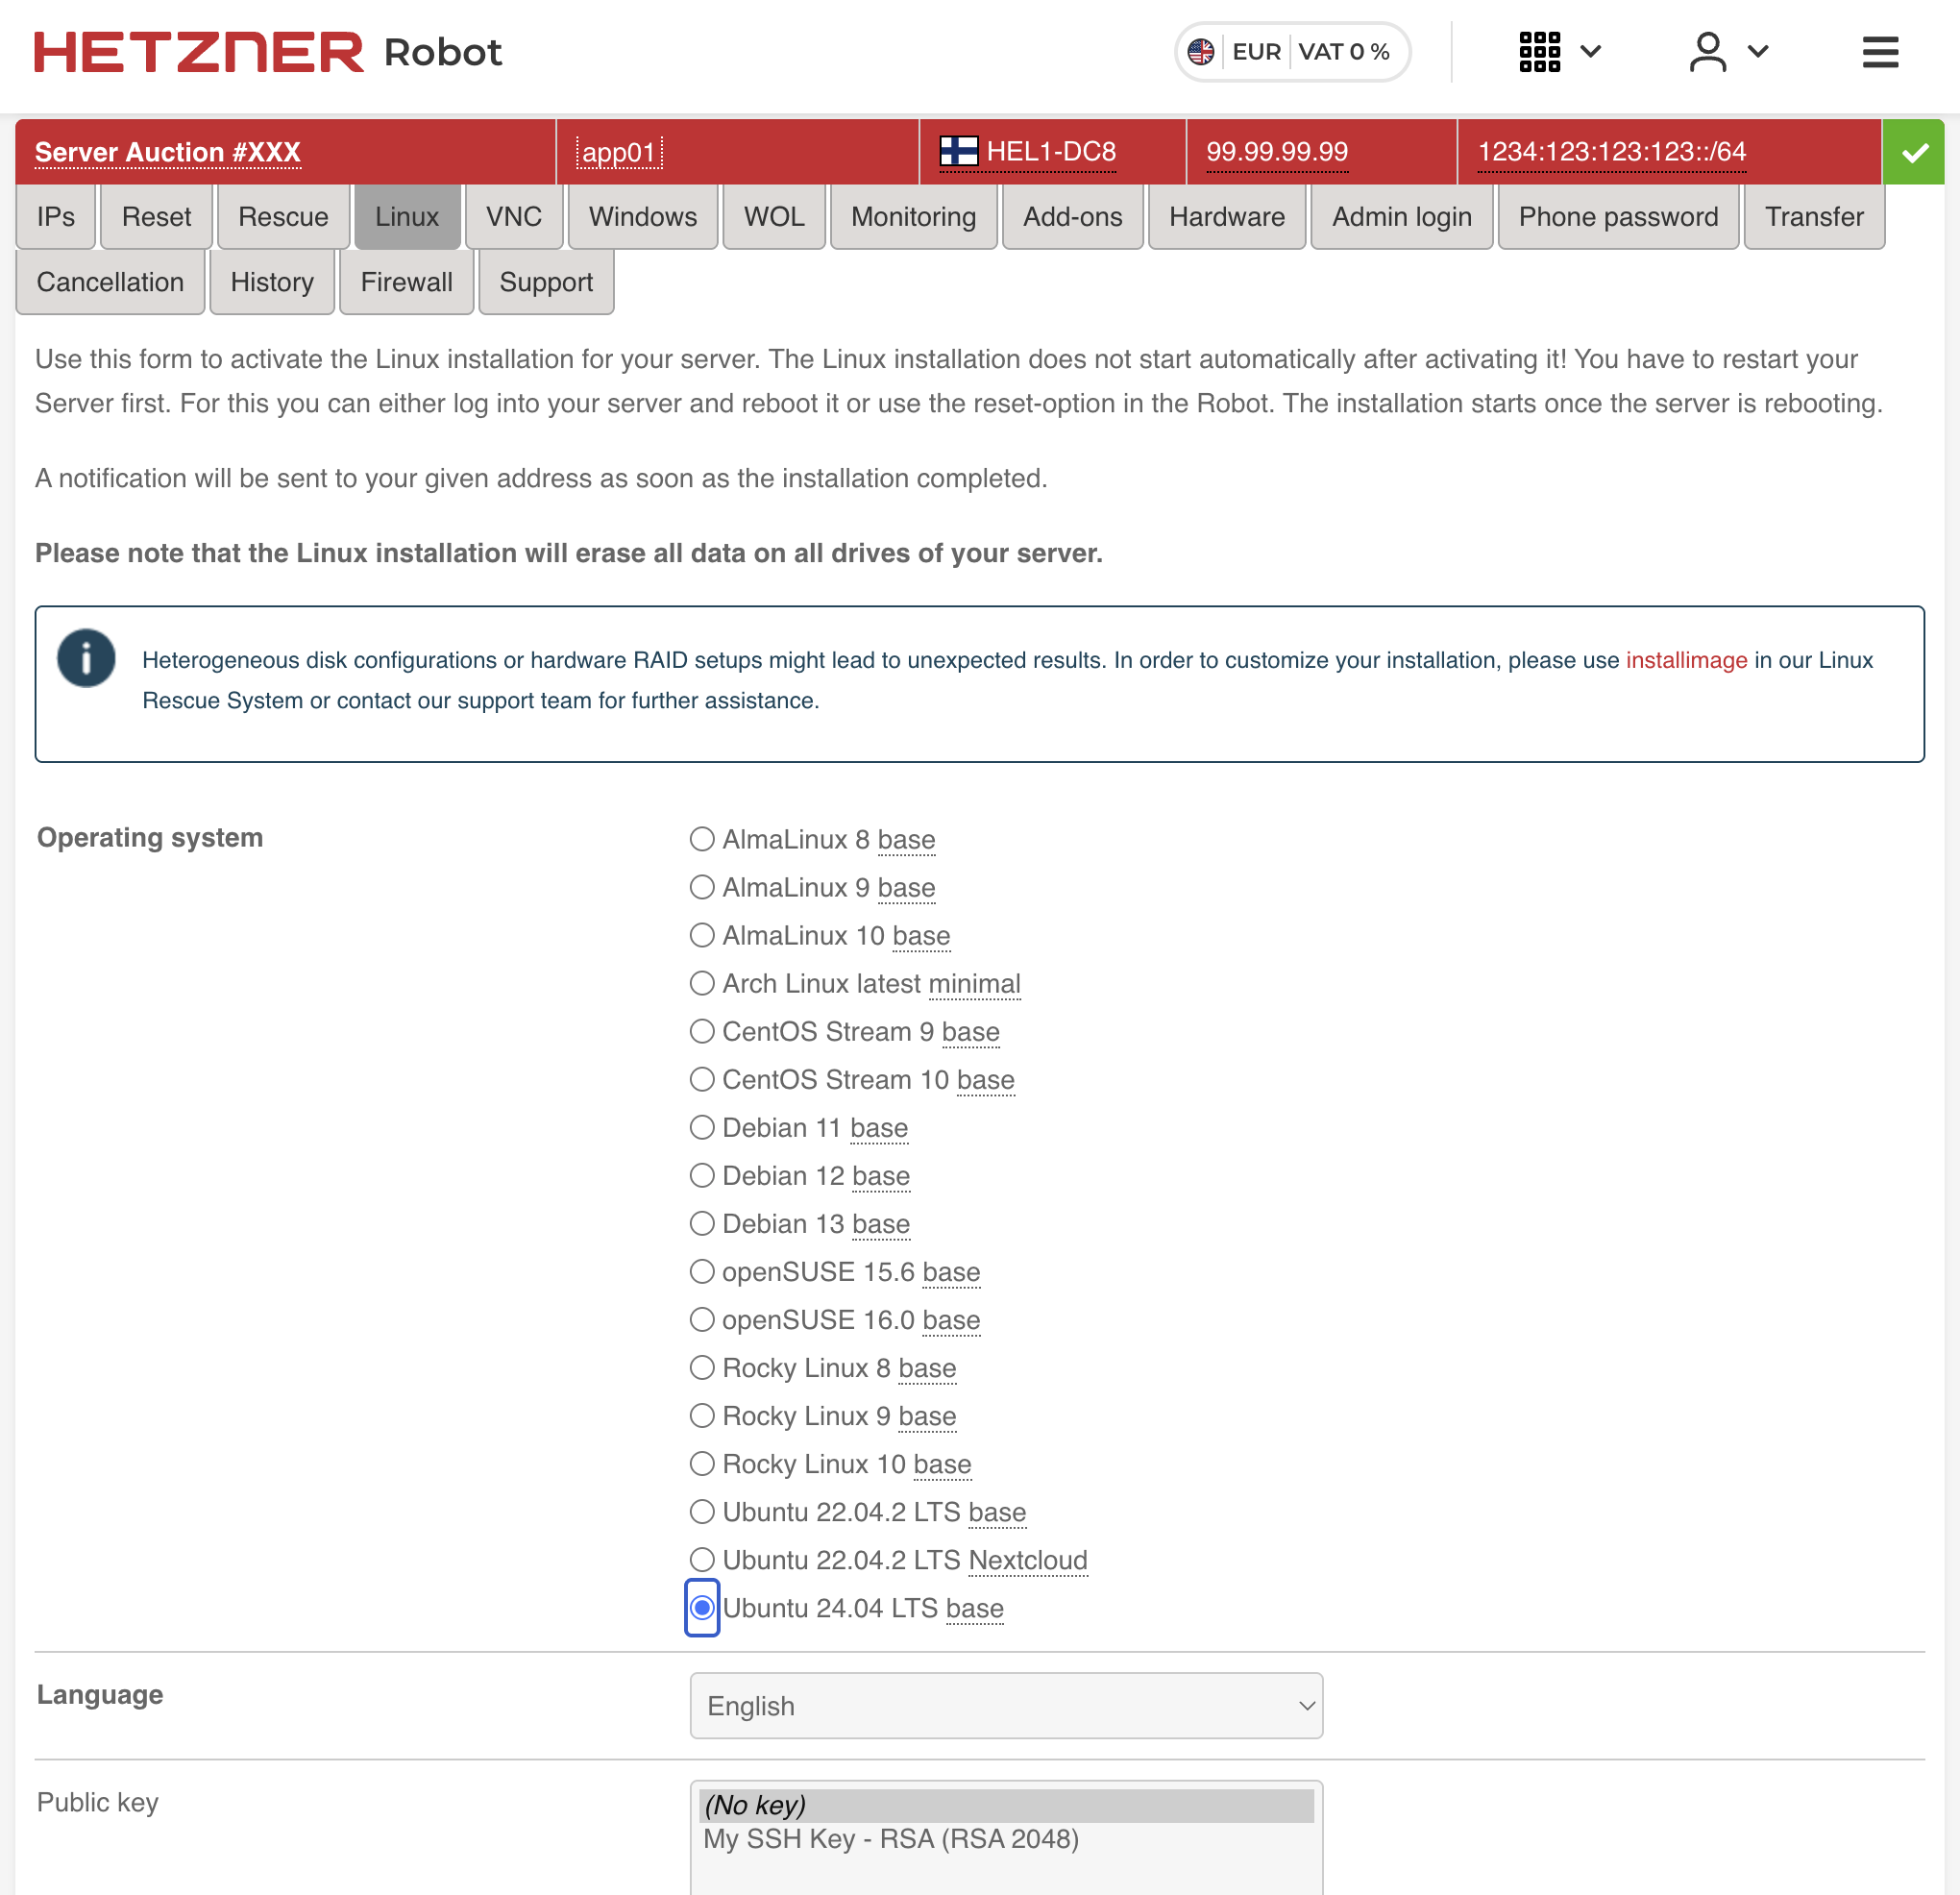
We will reinstall the OS with a clean Ubuntu 24.04 LTS base. Select it from the list, choose your SSH public key, and click Activate Linux Installation.
The installation does not start automatically — you need to SSH into the server and reboot it:
ssh root@203.0.113.10
reboot
The server will reinstall Ubuntu and come back online in a few minutes.
Setting Up the Hetzner Firewall
While we wait for the OS installation to complete, let us configure the firewall. In Hetzner Robot, go to your server and click the Firewall tab.
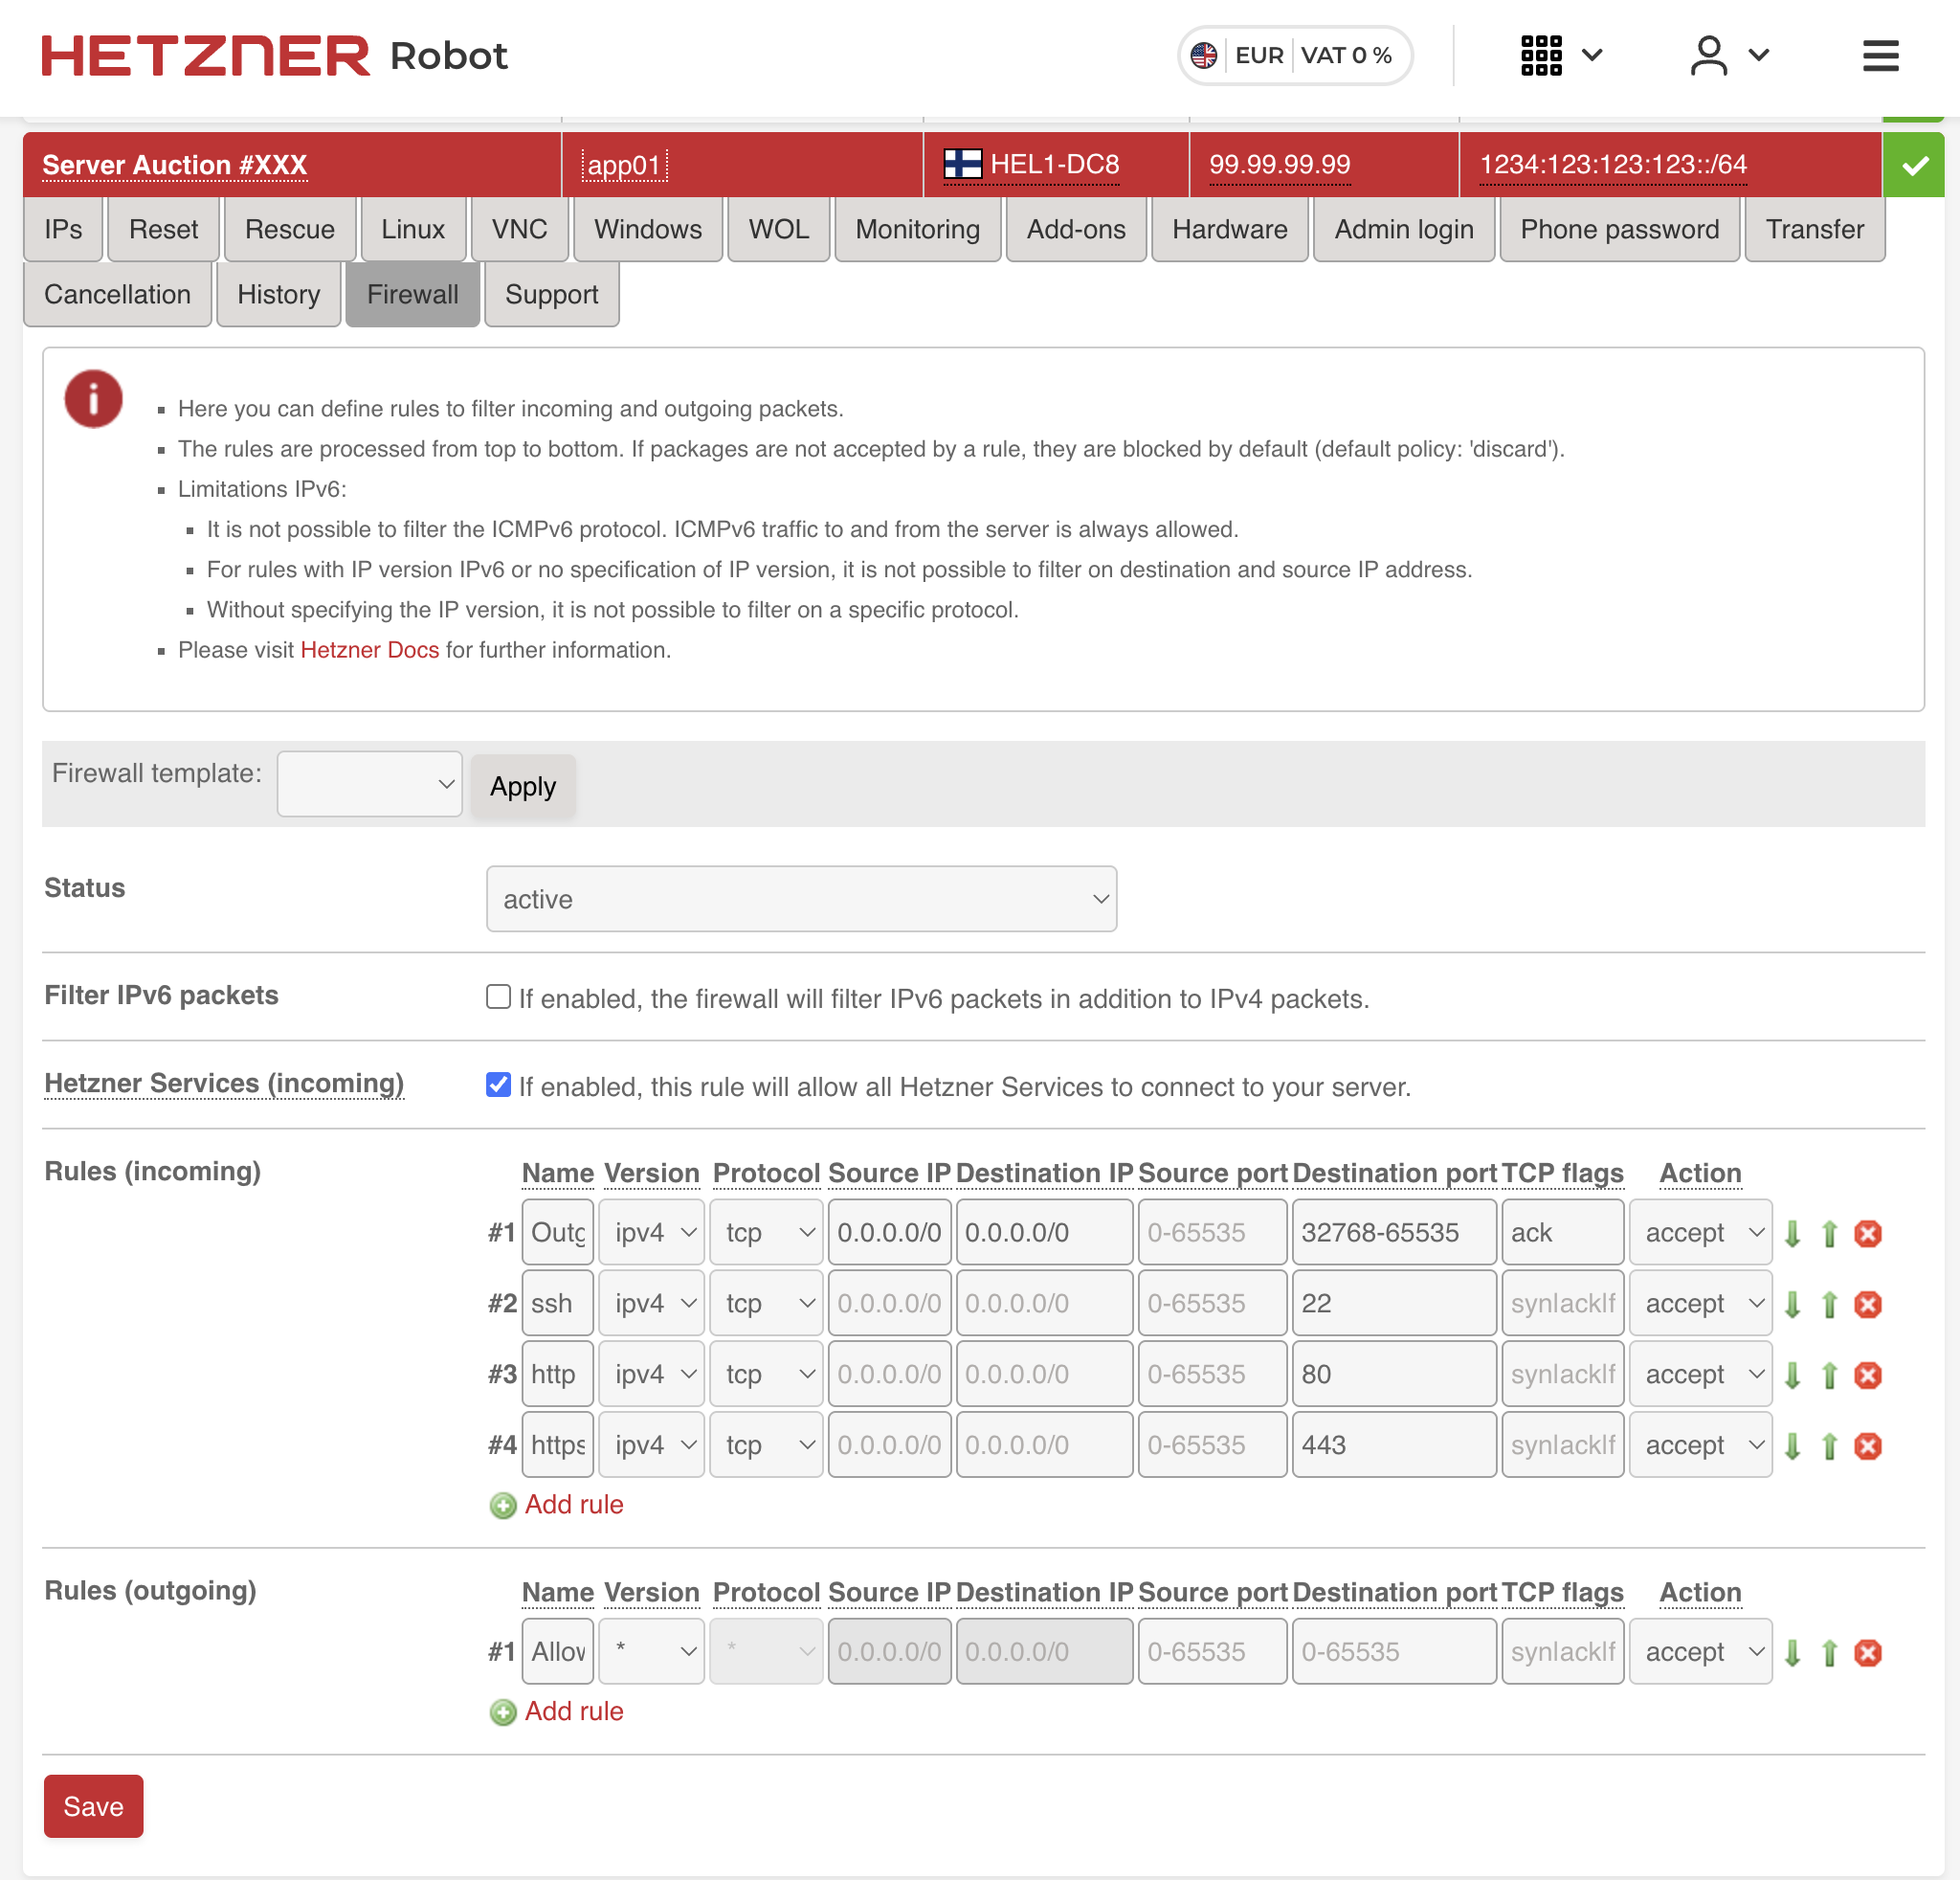
Add the following incoming rules:
| # | Name | Version | Protocol | Source IP | Dest IP | Dest Port | TCP Flags | Action |
|---|---|---|---|---|---|---|---|---|
| 1 | Outgoing TCP | ipv4 | tcp | 0.0.0.0/0 | 0.0.0.0/0 | 32768-65535 | ack | accept |
| 2 | ssh | ipv4 | tcp | 22 | syn/ack | accept | ||
| 3 | http | ipv4 | tcp | 80 | syn/ack | accept | ||
| 4 | https | ipv4 | tcp | 443 | syn/ack | accept |
Leave everything else blank and click Save. The first rule allows outgoing TCP responses (needed for your server to respond to requests). The remaining three open SSH, HTTP, and HTTPS.
Setting Up Ansible
With the server ready, we need to install Docker, configure the firewall (on the OS level), harden SSH, and set up a few other things. You could do this manually, but Ansible makes it repeatable and documented.
First, install Ansible on your local machine:
# macOS
brew install ansible

# Ubuntu/Debian
sudo apt install ansible
We will use kamal-ansible-manager, an excellent Ansible playbook by Guillaume Briday that automates server provisioning specifically for Kamal deployments. It is idempotent — safe to run multiple times — and handles everything your server needs.
Clone it into your project:
git clone https://github.com/guillaumebriday/kamal-ansible-manager config/ansible
cd config/ansible
Set up the inventory file with your server IP:
cp hosts.ini.example hosts.ini
Edit hosts.ini:
[webservers:vars]
ansible_become_method=su
ansible_user=root

[webservers]
203.0.113.10
Install the Ansible requirements (community roles for swap, firewall, etc.):
ansible-galaxy install -r requirements.yml
Now run the playbook:
ANSIBLE_HOST_KEY_CHECKING=False ansible-playbook -i hosts.ini playbook.yml
This will take a few minutes. Here is what the playbook does:
- Docker — Installs Docker CE from the official Docker repository. Kamal needs Docker to build and run containers.
- Fail2ban — Intrusion prevention that automatically bans IPs after repeated failed SSH login attempts.
- UFW (Uncomplicated Firewall) — Configures OS-level firewall rules: deny all incoming traffic except ports 22, 80, and 443. This is a second layer of defense on top of the Hetzner firewall.
- NTP — Time synchronization so your server’s clock stays accurate. Important for SSL certificates and log timestamps.
- Swap — Creates a swap file. Useful for smaller servers to prevent out-of-memory kills during deployment builds.
- SSH hardening — Disables password authentication, disables root login (key-only access), and turns off unnecessary SSH features.
- Unattended upgrades — Automatically installs security updates.
Wait for the playbook to complete. Your server is now ready for Kamal.
The Production Dockerfile
Kamal deploys Docker images, so you need a Dockerfile. Rails 8 generates an excellent one by default with rails new. Here is what it looks like:
# syntax=docker/dockerfile:1
# check=error=true
ARG RUBY_VERSION=3.4.8
FROM docker.io/library/ruby:$RUBY_VERSION-slim AS base

WORKDIR /rails

RUN apt-get update -qq && \
    apt-get install --no-install-recommends -y curl libjemalloc2 libvips sqlite3 && \
    ln -s /usr/lib/$(uname -m)-linux-gnu/libjemalloc.so.2 /usr/local/lib/libjemalloc.so && \
    rm -rf /var/lib/apt/lists /var/cache/apt/archives

ENV RAILS_ENV="production" \
    BUNDLE_DEPLOYMENT="1" \
    BUNDLE_PATH="/usr/local/bundle" \
    BUNDLE_WITHOUT="development" \
    LD_PRELOAD="/usr/local/lib/libjemalloc.so"

FROM base AS build

RUN apt-get update -qq && \
    apt-get install --no-install-recommends -y build-essential git libyaml-dev pkg-config && \
    rm -rf /var/lib/apt/lists /var/cache/apt/archives

COPY Gemfile Gemfile.lock ./

RUN bundle install && \
    rm -rf ~/.bundle/ "${BUNDLE_PATH}"/ruby/*/cache "${BUNDLE_PATH}"/ruby/*/bundler/gems/*/.git && \
    bundle exec bootsnap precompile --gemfile

COPY . .

RUN bundle exec bootsnap precompile app/ lib/

RUN SECRET_KEY_BASE_DUMMY=1 ./bin/rails assets:precompile

FROM base

RUN groupadd --system --gid 1000 rails && \
    useradd rails --uid 1000 --gid 1000 --create-home --shell /bin/bash
USER 1000:1000

COPY --chown=rails:rails --from=build "${BUNDLE_PATH}" "${BUNDLE_PATH}"
COPY --chown=rails:rails --from=build /rails /rails

ENTRYPOINT ["/rails/bin/docker-entrypoint"]

EXPOSE 80
CMD ["./bin/thrust", "./bin/rails", "server"]
This is a multi-stage build with three stages: base installs runtime dependencies, build adds compilation tools and builds everything, and the final stage copies only what is needed — keeping the image around 250-350 MB instead of 700+ MB.
A few things worth understanding:
jemalloc (libjemalloc2 with LD_PRELOAD) replaces Ruby’s default memory allocator. Ruby’s glibc malloc is known to cause memory bloat in long-running processes. jemalloc typically reduces memory usage by 20-30%.
Thruster is the HTTP/2 proxy that ships with Rails 8. It is built in Go by Basecamp and distributed as a Ruby gem with pre-built platform binaries. When you see ./bin/thrust ./bin/rails server in the Dockerfile’s CMD, Thruster wraps Puma and provides several production features with zero configuration:
- Gzip/Brotli compression — with a security jitter to prevent compression-based attacks
- HTTP caching — in-memory caching of public assets so repeated requests never hit Rails
- X-Sendfile — efficient large file serving offloaded from Rails
- HTTP/2 support — modern protocol for better performance
Before Thruster, you needed Nginx or a CDN in front of Rails just for compression and caching. Thruster eliminates that requirement entirely.
Non-root user (UID/GID 1000) — the app runs as the rails user, not root. If a process is compromised, the attacker cannot access the rest of the system.
SECRET_KEY_BASE_DUMMY=1 — provides a fake secret key during asset precompilation so you do not need real production secrets in the build environment.
bootsnap precompilation — caches the parsing of Ruby files during the build for faster production boot times.
Setting Up Kamal
Kamal is an open-source Docker deployment tool for Rails. It lets you deploy to your own servers — bare metal, VPS, anything with SSH and Docker — with zero-downtime rolling restarts. No Kubernetes, no PaaS lock-in. One deploy.yml config file controls everything.
Kamal 2 ships with kamal-proxy, a purpose-built reverse proxy that handles request routing and built-in Let’s Encrypt SSL. It replaced Traefik from Kamal 1, offering instant traffic switching and simpler debugging.
Add Kamal to your Gemfile if it is not already there:
gem "kamal", require: false
gem "thruster", require: false
Run kamal init to generate the config:
bundle exec kamal init
This creates config/deploy.yml with a default configuration that uses Docker Hub. We will replace it with a config that uses a local Docker registry instead. Here is what yours should look like:
service: myapp
image: myapp

servers:
  web:
    - 203.0.113.10
  job:
    hosts:
      - 203.0.113.10
    cmd: bin/jobs start

proxy:
  ssl: true
  hosts:
    - myapp.com
    - www.myapp.com

registry:
  server: localhost:5555

env:
  secret:
    - RAILS_MASTER_KEY
  clear:
    SOLID_QUEUE_IN_PUMA: false

aliases:
  console: app exec --interactive --reuse "bin/rails console"
  migrate: app exec --interactive --reuse "bin/rake db:prepare"
  shell: app exec --interactive --reuse "bash"
  logs: app logs -f
  dbc: app exec --interactive --reuse "bin/rails dbconsole --include-password"

volumes:
  - "myapp_storage:/rails/storage"

asset_path: /rails/public/assets

builder:
  arch: amd64
Let us walk through each section.
service and image — The name of your app. Kamal uses this for naming containers, volumes, and network resources.
servers — Two roles on the same host. The web role runs Puma (your web server). The job role runs bin/jobs start to process background jobs via Solid Queue in a separate container. This gives you better resource isolation — a runaway job will not starve web requests.
proxy — Kamal’s built-in proxy (kamal-proxy). With ssl: true and a list of hosts, it automatically provisions Let’s Encrypt certificates for your domains. Kamal-proxy handles SSL termination and routes requests to your app.
registry — This is set to localhost:5555, a local Docker registry running on your server. Instead of pushing images to Docker Hub or AWS ECR and pulling them back down, you push directly to a registry on the server itself. This means:
- No dependency on external services (Docker Hub, GHCR, ECR)
- No rate limits or authentication to manage
- No external service costs
- Significantly faster deploys — no round-trip over the internet
The local registry is started automatically by kamal setup as part of the first deploy.
env — RAILS_MASTER_KEY is a secret read from .kamal/secrets. SOLID_QUEUE_IN_PUMA: false tells Rails to run Solid Queue as a separate process rather than inside Puma.
aliases — Shortcuts for daily operations. After deploying, kamal console gives you a Rails console, kamal logs tails logs, kamal shell opens a bash shell in the container.
volumes — Maps a named Docker volume to /rails/storage. This is critical. SQLite databases, ActiveStorage uploads, and Solid Queue/Cache/Cable data all live here. Without this volume, you would lose all data on every deploy.
asset_path — Bridges fingerprinted assets between the old and new container during deployment. Without this, users who loaded a page just before the deploy would get 404s for JS/CSS files that no longer exist in the new container.
builder — amd64 to match Hetzner server architecture. If you build on an Apple Silicon Mac, Kamal handles cross-compilation automatically.
The full request flow looks like this:
Secrets
kamal init creates .kamal/secrets for managing sensitive environment variables. This file should already be in .gitignore. At minimum, you need:
# .kamal/secrets

# Improve security by using a password manager. Never check config/master.key into git!
RAILS_MASTER_KEY=$(cat config/master.key)
Kamal reads this file during deployment and injects the values as environment variables into your containers. The secrets never end up in the Docker image or your git history. You can also pull secrets from password managers like 1Password — see the comments in the generated file for examples.
Setting Up the Solid Stack
The Solid stack is Rails 8’s set of database-backed replacements for Redis and Sidekiq. Everything runs on SQLite — no external services needed.
- Solid Queue — Background job processing. Replaces Sidekiq and Redis. Jobs are stored in a dedicated SQLite database.
- Solid Cache — Cache store backed by SQLite. Replaces Redis for fragment caching, Russian doll caching, and other Rails caching patterns.
- Solid Cable — Action Cable adapter for WebSockets. Replaces Redis pub/sub for real-time features.
Database Configuration
Rails 8 uses four separate SQLite databases in production — one for your application data and one each for cache, queue, and cable. Here is the production section of config/database.yml:
default: &default
  adapter: sqlite3
  max_connections: <%= ENV.fetch("RAILS_MAX_THREADS") { 5 } %>
  timeout: 15000

production:
  primary:
    <<: *default
    database: storage/production.sqlite3
  cache:
    <<: *default
    database: storage/production_cache.sqlite3
    migrations_paths: db/cache_migrate
  queue:
    <<: *default
    database: storage/production_queue.sqlite3
    migrations_paths: db/queue_migrate
  cable:
    <<: *default
    database: storage/production_cable.sqlite3
    migrations_paths: db/cable_migrate
Separating into four databases is deliberate. Cache writes are frequent and bursty. Queue sees constant polling from Solid Queue workers. Cable handles real-time WebSocket state. Keeping them separate means each database has its own WAL (Write-Ahead Log) and its own lock, so they do not block each other.
All four files live under storage/, which maps to the Docker volume defined in deploy.yml.
Queue Configuration
config/queue.yml controls Solid Queue’s workers and dispatchers:
production:
  dispatchers:
    - polling_interval: 1
      batch_size: 500
  workers:
    - queues: "*"
      threads: 3
      processes: <%= ENV.fetch("JOB_CONCURRENCY", 1) %>
      polling_interval: 0.1
Cache Configuration
config/cache.yml sets the cache size limit:
production:
  store_options:
    max_size: <%= 256.megabytes %>
    namespace: <%= Rails.env %>
Cable Configuration
config/cable.yml configures Solid Cable:
production:
  adapter: solid_cable
  connects_to:
    database:
      writing: cable
  polling_interval: 0.1.seconds
  message_retention: 1.day
Production Settings
In config/environments/production.rb, wire everything up:
# Use Solid Cache as the cache store
config.cache_store = :solid_cache_store

# Use Solid Queue for background jobs
config.active_job.queue_adapter = :solid_queue
config.solid_queue.connects_to = { database: { writing: :queue } }

# SSL is terminated by kamal-proxy, tell Rails to generate HTTPS URLs
config.assume_ssl = true

# Store uploaded files on local disk (backed by the Docker volume)
config.active_storage.service = :local
Background Jobs
The job server defined in deploy.yml runs bin/jobs start. This script boots Rails and starts Solid Queue:
#!/usr/bin/env ruby
require_relative "../config/environment"
require "solid_queue/cli"
SolidQueue::Cli.start(ARGV)
Solid Queue also supports recurring jobs via config/recurring.yml, replacing cron:
production:
  cleanup_old_records:
    command: "OldRecord.where('created_at < ?', 30.days.ago).delete_all"
    schedule: every day at 3am

  retry_failed_jobs:
    command: "SolidQueue::FailedExecution.find_each(&:retry)"
    schedule: every 10 minutes
ActiveStorage Setup
ActiveStorage stores uploaded files on the local disk by default, which works perfectly with our Docker volume setup.
In config/storage.yml:
local:
  service: Disk
  root: <%= Rails.root.join("storage") %>
For publicly accessible files (avatars, product images, etc.), enable proxy mode. This serves files through a Rails controller URL instead of a redirect to the direct disk path. This is important if you later add Cloudflare — proxied URLs can be cached by the CDN, redirect URLs cannot.
To enable proxy mode globally, add this to an initializer:
# config/initializers/active_storage.rb
Rails.application.config.active_storage.resolve_model_to_route = :rails_storage_proxy
With this setting, all attachment URLs generated by url_for, image_tag, and similar helpers will automatically route through the proxy controller. No changes needed in your views or models — existing code like image_tag(user.avatar) will just work.
First Deploy
Make sure Docker is installed and running on your local machine (needed to build images).
Before deploying, check the entrypoint script at bin/docker-entrypoint:
#!/bin/bash -e
if [ "${@: -2:1}" == "./bin/rails" ] && [ "${@: -1:1}" == "server" ]; then
  ./bin/rails db:prepare
fi
exec "${@}"
This runs before your app starts. It detects whether the container is starting the web server (not the job worker) and runs db:prepare first — creating databases and running migrations automatically on deploy. This means you never need a separate migration step.
For your very first deployment, run:
kamal setup
This single command does everything: sets up the local Docker registry on your server, builds your Docker image, pushes it to the registry, deploys your application containers (web and job), boots any accessories defined in your config, and starts kamal-proxy with SSL certificates.
For subsequent deploys:
kamal deploy
This builds a new image, pushes it, and performs a rolling restart with zero downtime. Note that kamal deploy does not reboot accessories — they run independently and only need rebooting when you change their configuration.
Your daily operations are covered by the aliases:
kamal console    # Rails console on a running container
kamal logs       # Tail application logs
kamal shell      # Bash shell inside the container
kamal migrate    # Run db:prepare manually
kamal dbc        # Database console (SQLite)
Your app should now be live at https://myapp.com.
Production Hardening: Backups, Monitoring, and CDN
The basic deployment is complete. Here are some additional improvements you can make. Each of the Ansible-based steps below involves adding a new role to your playbook — after making changes, re-run the playbook to apply them:
cd config/ansible
ANSIBLE_HOST_KEY_CHECKING=False ansible-playbook -i hosts.ini playbook.yml
The playbook is idempotent, so it is safe to run as many times as you need.
Cloudflare for DNS, SSL, and Caching
Adding Cloudflare in front of your server gives you DNS management, free SSL certificates, CDN caching, and DDoS protection.
1. Add your domain to Cloudflare
Sign up at cloudflare.com, add your domain, and update your domain registrar’s nameservers to the ones Cloudflare provides.
2. Create DNS records
In the Cloudflare DNS dashboard, add two records pointing to your server:
| Type | Name | Content | Proxy |
|---|---|---|---|
| A | myapp.com |
203.0.113.10 |
Proxied |
| A | www |
203.0.113.10 |
Proxied |
The www record can also be a CNAME pointing to myapp.com instead of a separate A record — either works. A CNAME means you only need to update one record if your server IP changes.
3. Configure SSL/TLS
In the Cloudflare dashboard, go to SSL/TLS and set the encryption mode to Full.
This is important — here is what the three modes do:
- Flexible — Cloudflare connects to your server over plain HTTP. This causes infinite redirect loops because kamal-proxy redirects HTTP to HTTPS, but Cloudflare keeps sending HTTP. Do not use this.
- Full — Cloudflare connects to your server over HTTPS and accepts any certificate (including the auto-provisioned Let’s Encrypt cert from kamal-proxy). This is the correct setting.
- Full (Strict) — Same as Full but Cloudflare validates that the certificate is from a trusted CA. This also works with Let’s Encrypt, but can cause brief errors during certificate renewal.
Use Full for the simplest setup.
With this configuration, the request flow becomes:
4. Turn on proxying
Make sure the orange cloud icon is enabled on your DNS records — this means traffic flows through Cloudflare’s network rather than going directly to your server. With proxying enabled, you get:
- CDN caching — static assets and ActiveStorage proxy URLs (configured earlier) are cached at Cloudflare’s edge locations worldwide
- DDoS protection — Cloudflare absorbs malicious traffic before it reaches your server
- Your server IP is hidden — DNS lookups return Cloudflare’s IP, not yours
If the cloud is grey (DNS only), traffic bypasses Cloudflare entirely and you get none of these benefits.
Also make sure config.assume_ssl = true is set in production.rb (we did this earlier). This tells Rails to generate HTTPS URLs even though it receives plain HTTP from the proxy chain.
Hetzner Storage Box for Off-Server Backups
Hetzner offers Storage Boxes — cheap network storage that you can mount on your server via Samba/CIFS. This gives you an off-server location for backups that appears as a regular directory on your server.
Add a storage_box role to your Ansible playbook. First, create the variables file at config/ansible/roles/storage_box/vars/main.yml:
---
# Storage Box credentials
# IMPORTANT: Encrypt this file with Ansible Vault for production:
#   ansible-vault encrypt config/ansible/roles/storage_box/vars/main.yml

storage_box_username: u123456
storage_box_password: your-storage-box-password
storage_box_server: u123456.your-storagebox.de
storage_box_share: backup/myapp01
storage_box_mount_point: /mnt/storage_box
storage_box_credentials_file: /etc/backup-credentials.txt
You will find these credentials in the Hetzner Robot panel under your Storage Box settings. The storage_box_share is the subdirectory on the storage box — create it to keep backups organized per server.
Now create the tasks at config/ansible/roles/storage_box/tasks/main.yml:
---
- name: Install cifs-utils package
  ansible.builtin.apt:
    name: cifs-utils
    state: present
    update_cache: true

- name: Create credentials file for storage box
  ansible.builtin.copy:
    dest: "{{ storage_box_credentials_file }}"
    content: |
      username={{ storage_box_username }}
      password={{ storage_box_password }}
    owner: root
    group: root
    mode: "0600"
  notify: Remount storage box

- name: Create mount point directory
  ansible.builtin.file:
    path: "{{ storage_box_mount_point }}"
    state: directory
    owner: root
    group: root
    mode: "0755"

- name: Mount storage box via fstab
  ansible.posix.mount:
    path: "{{ storage_box_mount_point }}"
    src: "//{{ storage_box_server }}/{{ storage_box_share }}"
    fstype: cifs
    opts: "iocharset=utf8,rw,credentials={{ storage_box_credentials_file }},uid=1000,gid=1000,file_mode=0660,dir_mode=0770"
    state: mounted
Create config/ansible/roles/storage_box/handlers/main.yml:
---
- name: Remount storage box
  ansible.posix.mount:
    path: "{{ storage_box_mount_point }}"
    state: remounted
The variables (storage_box_server, storage_box_username, storage_box_password, etc.) should be encrypted with Ansible Vault:
ansible-vault encrypt roles/storage_box/vars/main.yml
Add the role to the roles: list in your playbook.yml:
roles:
  - wait_for_connection
  - packages
  - storage_box      # add this
  - docker
  - firewall
  - security
  - geerlingguy.swap
  - reboot_if_needed
Re-run the playbook to apply the changes. The storage box will be mounted at /mnt/storage_box.
Netdata for Monitoring
When you are running your own server instead of a PaaS, you are responsible for knowing when things go wrong. Is the server running out of memory? Is the disk filling up? Is a Docker container eating all the CPU? Without monitoring, you will not know until your app goes down.
Netdata is a monitoring tool that gives you real-time visibility into everything happening on your server — CPU, memory, disk I/O, network traffic, Docker containers, and hundreds of other metrics. The agent itself is open source (GPLv3+) and permanently free. Netdata Cloud — the SaaS dashboard where you view your data, set up alerts, and track historical trends — has a generous free tier that covers up to 5 nodes, which is more than enough for most single-server deployments. No Grafana, no Prometheus, no complex setup — just one Docker container and you have full observability.
Add a netdata role that deploys it as a Docker container. Create config/ansible/roles/netdata/templates/docker-compose.yml.j2:
version: '3'
services:
  netdata:
    image: netdata/netdata:edge
    container_name: netdata
    pid: host
    network_mode: host
    restart: unless-stopped
    cap_add:
      - SYS_PTRACE
      - SYS_ADMIN
    security_opt:
      - apparmor:unconfined
    volumes:
      - netdataconfig:/etc/netdata
      - netdatalib:/var/lib/netdata
      - netdatacache:/var/cache/netdata
      - /:/host/root:ro,rslave
      - /etc/passwd:/host/etc/passwd:ro
      - /etc/group:/host/etc/group:ro
      - /etc/localtime:/etc/localtime:ro
      - /proc:/host/proc:ro
      - /sys:/host/sys:ro
      - /etc/os-release:/host/etc/os-release:ro
      - /var/log:/host/var/log:ro
      - /var/run/docker.sock:/var/run/docker.sock:ro
    environment:
      - NETDATA_CLAIM_TOKEN={{ netdata_claim_token }}
      - NETDATA_CLAIM_URL={{ netdata_claim_url }}
      - NETDATA_CLAIM_ROOMS={{ netdata_claim_rooms }}
volumes:
  netdataconfig:
  netdatalib:
  netdatacache:
The template uses Jinja2 variables that Ansible fills in from the role’s vars file. Create config/ansible/roles/netdata/vars/main.yml:
---
netdata_claim_token: YOUR_CLAIM_TOKEN
netdata_claim_url: https://app.netdata.cloud
netdata_claim_rooms: YOUR_ROOM_ID
You will find your claim token and room ID in the Netdata Cloud dashboard under Nodes > Add Nodes. Like the storage box vars, encrypt this file with Ansible Vault for production.
Now create the task that deploys the template at config/ansible/roles/netdata/tasks/main.yml:
---
- name: Create netdata directory
  ansible.builtin.file:
    path: /opt/netdata
    state: directory
    mode: "0755"

- name: Deploy docker-compose.yml from template
  ansible.builtin.template:
    src: docker-compose.yml.j2
    dest: /opt/netdata/docker-compose.yml
    mode: "0600"
  notify: Restart netdata

- name: Start netdata container
  ansible.builtin.shell:
    cmd: docker compose up -d
    chdir: /opt/netdata
And the handler at config/ansible/roles/netdata/handlers/main.yml:
---
- name: Restart netdata
  ansible.builtin.shell:
    cmd: docker compose down && docker compose up -d
    chdir: /opt/netdata
Netdata runs with host networking and read-only access to host filesystems for full system visibility. The claim token connects it to your Netdata Cloud dashboard.
Add the role to your playbook.yml:
roles:
  - wait_for_connection
  - packages
  - storage_box
  - docker
  - netdata          # add this
  - firewall
  - security
  - geerlingguy.swap
  - reboot_if_needed
Re-run the playbook to deploy Netdata.
Litestream for SQLite Backup
Litestream continuously replicates your SQLite databases by streaming WAL (Write-Ahead Log) changes to a backup destination. It is like streaming replication for Postgres, but for SQLite.
Create config/litestream.yml:
dbs:
  - dir: /rails/storage
    pattern: "*.sqlite3"
    recursive: true
    replica:
      path: /backup
This automatically discovers all .sqlite3 files in your storage directory and replicates them.
Add it as a Kamal accessory in config/deploy.yml:
accessories:
  litestream:
    image: litestream/litestream
    host: 203.0.113.10
    cmd: "replicate"
    volumes:
      - /mnt/storage_box/backups/sqlite3/myapp:/backup
      - myapp_storage:/rails/storage
    files:
      - config/litestream.yml:/etc/litestream.yml:ro
Litestream runs as a sidecar container, continuously streaming changes to your Hetzner Storage Box. Boot it with:
kamal accessory boot litestream
If you later change the Litestream config, reboot it:
kamal accessory reboot litestream
Docker Volume Backup
For a belt-and-suspenders backup of everything in your storage volume (SQLite databases, ActiveStorage uploads, logs), use docker-volume-backup.
Add it as a Kamal accessory:
accessories:
  backup:
    image: offen/docker-volume-backup:v2
    host: 203.0.113.10
    volumes:
      - myapp_storage:/backup/myapp_storage:ro
      - /mnt/storage_box/backups/myapp_storage:/archive
      - /var/run/docker.sock:/var/run/docker.sock:ro
      - /etc/localtime:/etc/localtime:ro
    env:
      clear:
        BACKUP_FILENAME: backup-%Y-%m-%dT%H-%M-%S.tar.gz
        BACKUP_STOP_DURING_BACKUP_LABEL: myapp
        BACKUP_CRON_EXPRESSION: "@daily"
        BACKUP_PRUNING_PREFIX: "backup-"
        BACKUP_RETENTION_DAYS: 30
This runs daily, creates a tar.gz of the entire storage volume, and stores it on the Hetzner Storage Box. It automatically prunes backups older than 30 days.
To make the backup consistent, you need to update the servers section of your deploy.yml to add labels. Change it from the simple format to include hosts and labels:
servers:
  web:
    hosts:
      - 203.0.113.10
    labels:
      docker-volume-backup.stop-during-backup: myapp
  job:
    hosts:
      - 203.0.113.10
    cmd: bin/jobs start
    labels:
      docker-volume-backup.stop-during-backup: myapp
The stop-during-backup label tells docker-volume-backup to pause the app containers before taking the backup, ensuring SQLite databases are in a clean state.
Boot the backup accessory:
kamal accessory boot backup
If you change the backup config, reboot it:
kamal accessory reboot backup
Your Production Rails Stack
You now have a production Rails 8 deployment with:
- A Hetzner dedicated server provisioned with Ansible
- Kamal deploying your app with zero-downtime rolling restarts
- The Solid stack (Queue, Cache, Cable) running entirely on SQLite
- Automatic SSL via kamal-proxy and Let’s Encrypt
- Thruster handling HTTP compression and asset caching
- Background jobs in a separate container via Solid Queue
- Continuous SQLite backups via Litestream
- Daily full volume backups to a Hetzner Storage Box
- Server monitoring with Netdata
This entire stack runs on a single server with no external services — no Postgres, no Redis, no managed databases, no PaaS. For most Rails applications serving thousands of users, this is more than enough.
In future posts, I will cover advanced topics like wildcard subdomain routing with Caddy and on-demand TLS, detailed backup restore procedures, and multi-server deployments.